
How to Use LinkedIn to Build a Student Portfolio

Well-designed learner portfolios provide students an opportunity to chart their growth and tell their story. That’s why every student should have a digital portfolio. With the growing number of schools and universities encouraging learner to track and tell their personal and professional gains, students need to be fluent in showcasing their skills. A great place to start is on LinkedIn. This blog that first appeared on globaldigitalcitizen.org shares the step-by-step process of telling your story with LinkedIn.
GDC Team
Students under your tutelage will graduate eventually and will be out looking for colleges or jobs. They might do this the old-fashioned way by looking through the newspaper and pounding the pavement. The other possibility is that they’ll take advantage of Web tools and utilize our vast worldwide online network to secure their future careers. What better time to start preparing for this than during their formative years in school?
We suggest using LinkedIn, possibly the most-used professional networking tool out there. LinkedIn is for those who are actively seeking prospective colleges, employees, and employers.
While using LinkedIn, students in the U.S. who are 13 or older (see age requirements for other countries) can begin writing content-rich online resumes while still in school that will stay with them for the rest of their lives (or as long as LinkedIn service is available).
By continuously uploading and stacking their portfolios as they go along, students will be ready when grad time comes to go out there and show off their best.
Whether a student is actively looking for a job or college, or simply trying to compile their best work, LinkedIn could be the right tool for them. But there’s only one way to demonstrate that, so let’s get started.
1. Understand the Requirements
First of all, if you’re a teacher, you’ll need to read this.
Teens will need to read this.
Remember that you’ll need to be 13 yrs. or older and have your own email address in order to use LinkedIn.
2. Gather Information
If you’re good to go, start by gathering your pertinent data. Here’s what you’ll need:
1. Your most professional looking picture. Students must be aware that this isn’t like Facebook, so they should avoid uploading inappropriate or questionable images of any kind. Think of it as uploading an actor’s headshot. Put your best foot—and face—forward into the LinkedIn community.
2. A short blurb for your headline (a sentence or two) including:
- your level of expertise
- the kinds of people you want to work for
- what you do
- what benefit your potential employers/customers can get from your services
- contact details, email, phone number (you’ll be able to set security preferences)
3. A summary to back up your headline. You’ll want to prepare this with the best prose that you can. Create this thoughtfully and make it support your claims in your headline..
4. A list of your skills and expertise.
5. Your interests.
Of course, many students will not have a whole lot of work experience and may not have even graduated from high school at this point. No worries—it’s still a good idea to prepare them for the real world and teach them how to make themselves look marketable.
3. Sign Up
This is pretty straightforward. You’ll need an email address, and need to be of the appropriate age to sign up.
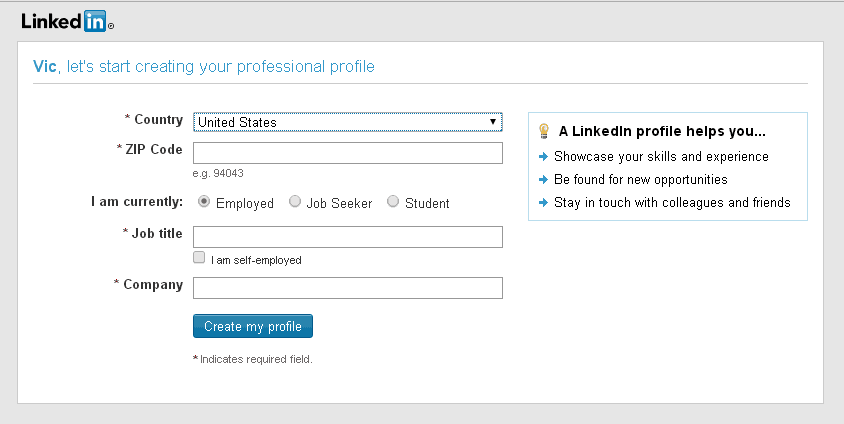
4. Create Your Professional Profile (Digital Portfolio)
Once you’ve completed the sign up, LinkedIn will begin to ask you a bunch of questions. You can answer these if you want, or you can skip them by clicking the little ‘X’ on the top right.
Beneath your profile where it says “Add a section to your profile,” you should see “view more.” Click on that—if you’ve already completed most of your profile and don’t see “Add a section to your profile” you’ll find it by clicking “Improve your profile.”
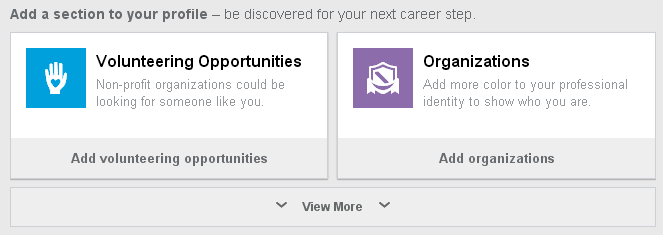
Voila—meet your student portfolio! You can see all kinds of categories. This is where you’ll do most of your portfolio building.
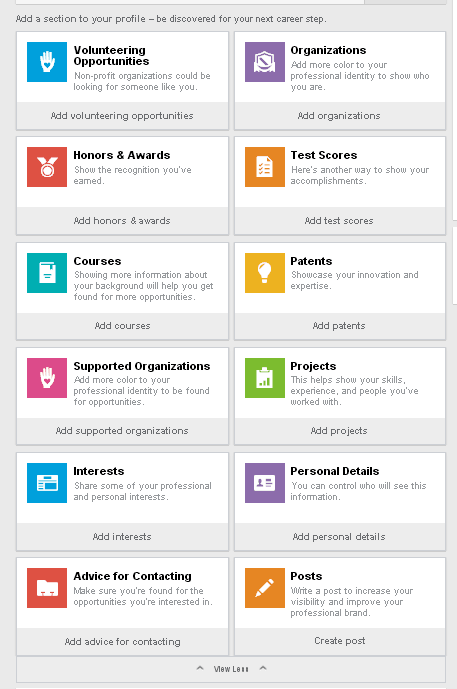
Begin by putting the information from Step 1 into its appropriate sections. As you’ll notice, there are some familiar headings from basic resume writing. There’s much more here in response to the added capabilities of the Web, and your students will surely have a great time creating their digital portfolios.
5. Set your Privacy and Security
Now to decide who can see what. How do you control this? When you click on your tiny picture icon at the top right of the screen, you’ll select “privacy and security settings.” (As this example is an adult LinkedIn profile and not a student’s, there will be differences in what you see, depending on your age.)

If a student has been using another digital portfolio service, by the age of 13 they’ll be ready to graduate to LinkedIn to make the most of what the web has to offer as far as networking goes. It’s our hope that this post could be the start of a great career or college path for your students!
For more, check out:


Roz Bahrami
Great post! I remember updating my LinkedIn profile after I graduated university and received several emails from employers. I think it's a great tool to show your work and describe yourself a little more informally.