
Teacher to Teacher: 7 Steps for Integrating Technology

You’ve attend district and campus staff development. You understand some of what the district’s chosen device can do. It’s time to get started.
1. Perfectionism and Control When using technology, perfectionism is out the door. If something can go wrong, it will. Try not to get too upset. Reassess and keep rolling. You are also going to have to relinquish some control. There will be times (lots of them if you’re lucky) where a student knows more about the technology than you do. This is an awesome and unique opportunity. Let the student help you. You have no idea how this can strengthen the relationships in your room. Students will feel trusted, smart and special. And that’s worth more than looking like you know everything.
2. Converting Notice I did not say creating. Start by taking a lesson you’ve done before and transforming it. How can you use technology with the lesson? If you are discussing the causes of the Civil War, consider using Padlet and have students post the causes to the classes wall. Or have a silent discussion of a video. Create a Today’s Meet room and have students reflect on the video in the room. This can be tricky for students because they will want to interact with each other and reply to each other’s comments then all of a sudden they have no idea what’s happening in the video. So start slow. This time they are just posting their reactions during the video and responding to others afterwards. Next time have them post their reaction and reply to only one of their classmates.
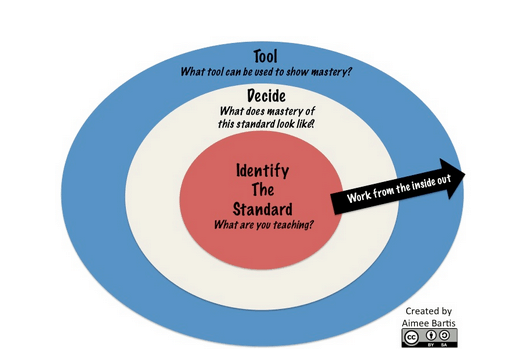
3. Lesson Planning After you have some converted lessons under your belt, it’s time to start creating your own lessons. Ensure that you lessons are standards focused. Don’t think, “Wow, I just found out about this really cool tool. I’m going to use it!” Instead think, “What tool will help me introduce or reinforce a standard?” Or “What tool will let my students show what they know the best?” After you know the standard you are teaching, decide what mastery of that standard would look like. Finally, you’re ready to choose a tool that will fit your standards and measure of mastery. I’ve created this image above as a visual reminder.
4. Creating The wonderful thing about technology is that it opens so many opportunities for students to create. Whenever possible, have them create something to demonstrate their knowledge. At the beginning of the year you may feel more comfortable having everyone create with the same tool. But in the second semester, try letting them choose their tool. You’ll be amazed at what they can do!
5. Collaborate If your district uses Google Apps for Education, utilize the collaborative features of Drive and Docs. You can share a folder with a class then everything you put in that folder will be shared with your students. Students can do their work in Google Docs and share it with you to be graded. Imagine the paper you’ll save! Students can work on a project together without having to be together.
6. Showcase Teachers are awesome at displaying student work. It lines the hallways, fills display cases, and decorates the library. When you make the move to digital, there’s not that much to display. Sure, some things can be printed out and hung up but many more spectacular creations will only exist online. First make sure you have parent permission then post projects on your teacher webpage. Most web-based creation sites will provide a link or embed code to the finished project.
7. Portfolios Along the same lines of showcasing student work is saving student work Help students keep a portfolio of their digital work. If your district uses Google Apps for Education, you can use Google Sites to create a portfolio that students can add to each year. A Google Drive folder can also be used to collect student writing samples. PowerPoint is another way to create student portfolios. Students copy the link to their project onto the slide and then reflect on the project below the link.
Integrating technology is an ongoing project. You are never finished. The key is to keep on learning. Technology changes at a rapid pace. It’s almost impossible to master. So, remember that you’re a student too. Keep learning and trying.
For more on tech integration see the Blended Learning Implementation Guide; for more on portfolios, see:


jack
Well done. I agree with so much of what you have written here, especially points 1 - 4. I teach older students (mostly introductory college), so there is not as much showcasing of material as there is with younger students, although I do promote student involvement in creating material as much as possible.
Mostly, I seized on your ideas about moving from a non-tech centered classroom into a more tech savvy class. I think it's very easy for instructors to get lost by attempting too much, too quickly. I consider myself a technophile, but it is still daunting to make the change!
Also, I saw that your graphic was creative commons and I am looking forward to using it soon in a talk on this topic and wanted to let you know that it's valuable to someone.
Karen Mahon
Thanks, Aimee! I love #3! Too often I think we're dazzled by the new, shiny objects and don't spend enough time in advance thinking about what we're trying to accomplish and what the mastery performance will look like. I agree with you wholeheartedly that answering those questions prior to choosing the tool really impacts not only the choice, but also the student performance achieved. Thanks for the reminder!